Any links on this page that lead to products on Amazon are affiliate links and I earn a commission if you make a purchase. Thanks in advance for your support! Read the full disclosure here.
You want to help the environment. You want to live more sustainably, so you decide to compost. There’s just one little problem. You live in an apartment or a house without a yard. Where do you put the compost bin? Have you ever wondered what is vermicomposting?
Vermicomposting is a great way to compost when you’re limited on space and yes, even time.
That’s right. Let’s dive into why vermicomposting could be a great solution for you when you don’t have the time to monitor or mix your compost.
Table of Contents
Stop Warming The Planet

When you don’t have an outdoor space for a compost bin, you might throw in the towel. I can hear you saying, “It’s just not the right time to compost. We do not have the ideal scenario.”
Sure. that may be the case. You’re making up excuses. The problem with this is you’re left throwing out your food waste.
When that food ends up in our landfills, it decomposes without oxygen, creating methane.
Methane is a greenhouse gas that warms our planet. This is not good!
Do you want your kids to grow up living in scorching hot weather? It’s already super hot in some areas of the world. Let’s not make it worse.
Vermicomposting for Beginners
What is vermicompost?
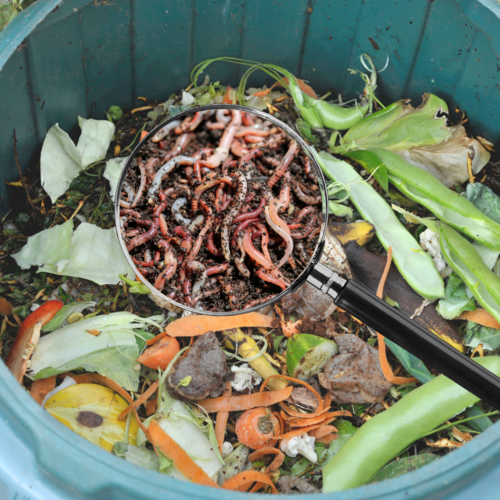
It’s composting with worms. Similar to composting outdoors, you can compost indoors.
The addition of worms to your compost speeds up the composting process. Just as you would with an outdoor bin, you add your kitchen scraps to your indoor bin and let the worms do the work.
There’s no need to turn the compost. Those worms are your little workers. They crawl around the bin aerating the organic material.
They crawl and eat their way through all of your scraps. In the meantime they’re also pooping in your bin. Before you get grossed out. Know that worm poop is the best!
Gardeners add worm poop to their gardens all the time to give their soil a nutrient boost.
Before planting our seeds or transplants, we sprinkled a bit of worm poop (worm castings) in the hole. Then we planted and covered with soil.
Another benefit of mixing worm castings into your soil is that it helps to hold in moisture.
What a time-saving win. Not only are you adding supercharged nutrients to your plants, but you also don’t have to water your plants as much!
Types of Vermicomposting Bins
There are so many ways to set up a vermicompost bin. You can either make one yourself or buy a vermicomposting kit.
DIY Vermicomposting Bin
There are so many DIY instructions for how to make your own bin online. The EPA outlines a pretty easy one.
You basically take two bins (the ones you find at the hardware store; either rectangular or circular), and drill a bunch of holes in them.
Then, you stack one bin on top of the other. Add your paper, soil, water, worms, and food scraps, and you’re done.
Worm Compost Bin DIY for Beginners
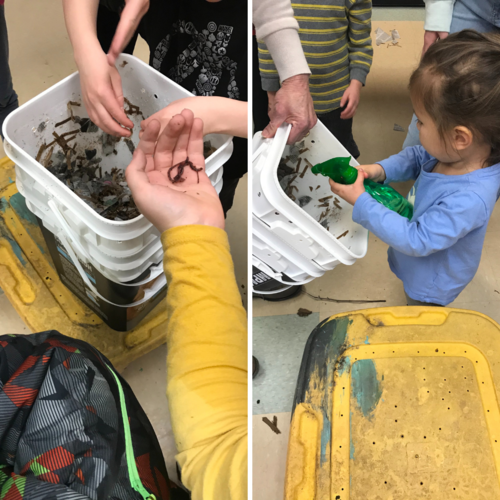
We went to a local workshop on vermicomposting at home.
They showed us how to repurpose old cat food buckets with lids. Genius! If you go the DIY route, find a cat lover. They’re sure to have buckets to give away. They’ll be perfect for your DIY worm compost bin.
Personally, I’m not a fan of worms, and used this workshop to get over my fear.
When I saw my daughter and other kids get excited at these worms wriggling around, I knew I needed to put on my big kid pants and embrace the slimy little guys.
These kids put their hands in the bucket. They picked up worms and giggled as the worms crawled up and down their hands.
What Vermicompost Bin Is Right For You?
The vermicomposting workshop convinced us we needed to add a worm compost bin in our home.
After all, it’ll put our food scraps to good use and we will get free worm castings from it.
Why We Decided Against a DIY Bin
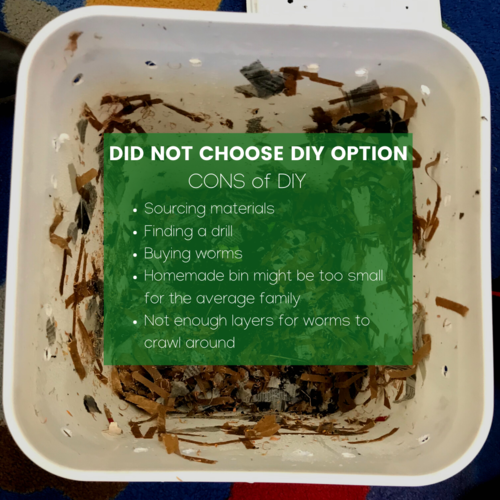
We liked the idea of saving money on a DIY bin; however, the time to gather supplies, drill, and find out where to buy worms was a major roadblock.
We considered a DIY bin for weeks and then decided it was too much of a hassle.
We just wanted a kit that included everything we needed since this was our first time vermicomposting.
Pros of DIY
- Very Inexpensive
Cons of DIY
- Need to source materials
- Find a drill if you don’t already have one
- Buy worms or find someone who will give them away
- Homemade bin might be too small for the average family; not enough layers for worms to crawl around
Vermicompost Kit With Worm Factory 360
There are a few options for buying a pre-made vermicompost bin. In the end, we decided to go with the Worm Factory 360.

This kit includes everything you need to start your first vermicompost.
When you’re a newbie like us, or don’t have the time for DIY projects, this kit is definitely for you.
- Design and Size – The Worm Factory 360 can house over 10,000 worms. It’s designed for the best airflow, but it keeps the smell locked inside.
- Material – High quality recycled plastic.
- Vertical Worm Movement – This tiered worm bin allows your worms to crawl up through your bin as the bottom trays continue to decompose. Your red wigglers will always have enough to eat and space to crawl.
- Accessories – The kit comes with a compost thermometer to make sure your compost isn’t too hot or cold; a scraping tool; a hand rake.
- Bedding Materials – This is the best part. It comes bags of shredded paper, rock dust, pumice, and coconut coir. These are all the best things to start a new vermicompost bin in the right way.
- Worms – There’s an option to add-on a shipment of worms. They source the best red wigglers. Of course, we chose to do this!
Vermicomposting with the Worm Factory 360
We have been very pleased using the Worm Factory 360 bin. It’s super easy to use and requires very little maintenance.
Ideal Temperatures for Vermicomposting
We decided to place our bin in the basement where the temperature stays around 65-70 degrees Fahrenheit. Ideal temperatures for worm composting is between 40 and 80 degrees Fahrenheit.
This is why it’s a perfect option for folks who want to compost indoors.
Year-Round Composting
Especially with outdoor composting, you need sunlight and heat to decompose your organic matter.
With vermicomposting indoors, you can take your food scraps and compost year-round. Let the worms do all the work for you.
The worms will eat your scraps and in return give back with extra nutrient-rich worm poop.
Seriously Odor-Free Vermicomposting At Home
We thought there would be some smells from the Worm Factory 360.
Wrong!
There’s no odor. No stench whatsoever.
This makes it the perfect composter for small spaces especially if you live in an apartment or live somewhere without a yard.
Worm Factory 360 Vertical Expansion
The challenge with DIY bins is that you’re often limited to one area where the worms eat and poop.
This means you are constantly digging to the bottom to find worms castings that are ready.
With the Worm Factory 360, when the tray is full, you add another tray on top.
This kit comes with 4 trays included. There’s an option to add up to 8 trays. That’s a lot of worm poop!
Going vertical means you’re maximizing your space inside.
The trays have holes in them for the worms to migrate up. This allows the bottom trays to continue to fully decompose.
The lid is also a nice feature. Not only does the lid keep your worms inside the bin, but they also provide a handy place to stack your trays. When you’ve filled up all four trays, you take the top three trays and place them onto the lid.
This keeps your home clean and allows you easy access to the bottommost tray where your finished compost awaits.
Common Questions Vermicomposting
- What should I feed my worms? Include equal portions of browns and greens. Browns (carbon or carbohydrates) include newspaper, paper clippings, paper towels, eggshells, leaves. Greens (nitrogen or protein) include vegetable food scraps, bread, fruit, pasta, tea bags, coffee grounds, grains.
- What should I not feed my worms? Meats, fat, oil, dairy, citrus, onions, garlic, hot peppers, non-biodegradable items, soap, glossy or colored paper, poisonous plants.
- Will my worm bin attract fruit flies? Potentially. To avoid this bury your food waste and don’t overload the worms with too much food.
- Will my worm bin smell? It should not. If there are strong odors, stop putting in food. Wait until the worms finish eating and then add more.
- What’s the chance worms crawl out? Very slim unless you add citrus, which makes the bedding too acidic. These worms don’t like that. Just avoid citrus.
Final Thoughts on Vermicomposting Worm Farm Indoors
Vermicomposting indoors is a great option if you don’t have a ton of space, an outdoor yard, or lack the time to manage a regular compost bin.
You can set up the Worm Factory 360 indoors anywhere since it stacks vertically as you add more trays. It also comes complete with guided instructions. You cannot mess this up.
The Worm Factory 360 is perfect if you’re new to composting. This kit comes with everything you’ll need to setup the ideal environment for your red worms.
If you’re creeped out by worms, you never have to touch them. They come bagged for you to dump in your tray. When it’s time to harvest your compost, use the included hand rake to move things around.
Let me know in the comments below if you’re interested in vermicomposting and want to get started!
Growmuse.com is a participant in the Amazon Services LLC Associates Program, an affiliate advertising program designed to provide a means for sites to earn commission by linking to Amazon.com. This is done at no cost to you. Read the full disclosure here.