Every vegetable garden needs a crop plan. Grab a copy of this free vegetable garden planner template to plan your garden today and stay on track. Never miss a key planting date ever again.
Staying organized will help you grow more vegetables in the space you have available. With a plan you know exactly when it’s time to plant something else when a space opens up. Open spaces might happen before you plant one crop or after a harvest.
More planting means more food on the table for your family!
Let’s get into the fun stuff!
Table of Contents
Crop Planning 101: What You Really Need To Know To Use The Free Vegetable Garden Planner Template

Measure and Sub-Divide Growing Space
Decide what garden style is right for you. Read here for raised garden bed benefits and how to set up one like ours.
Then, use a free tool like Google Drawing to measure out and draw your growing space.
Download and copy our Vegetable Garden Map tool here. It’s listed under the Google Drawings section of the post towards the bottom of that section.
Gather Dates for Local Temperatures
You should know your critical nighttime temperature averages, so you’re planting the right crops at the right time…not when it’s too cold or too hot.
If you plant at the right time, you can isolate challenges more easily. More on how to find the right temperatures for plants later.
Choose Plant Varieties
What plants do you want to grow and eat? Choose varieties that will work for your area and climate.
We go through some great vegetables to start out with here.
Calculate Number of Plants That Fit Space
Use the same drawing you used to measure and sub-divide your space.
Take a look at the plant varieties you want to grow, and create objects to-scale representing their planting spaces. When you do this, you’ll be able to move plants around your different spaces.
This also allows you to figure out how many plants can go in that bed and avoid overcrowding.
Remember tallest crops always go on the north side of the bed, so move those plants to that side. Get out your compass folks. Or just follow the sun movement around your space. Not sure how to do that? Follow the instructions here to map your sun in your garden space.
Take a look at the plant varieties you want to grow, and create objects to-scale representing their planting spaces. When you do this, you’ll be able to move plants around your different spaces.
Plan First Round of Plants for Season
Plan the EXACT DATES on your planner for when you’ll start seeds and/or buy (or gather for free from a friend) your seedlings.
Use the days to maturity for plants and their ideal growing temperatures to determine planting schedules. Note: This all assumes you’re not using season extenders to plant early or later in the season.
Read seed packets or reference Johnny’s or High Mowing to see the specifics growing needs of each plant. They’re all different.
While this may seem like a real pain, it’s quite necessary as you’ll see in our garden plan revisions.
Plan Second Round For Season
You’ve listed out the dates for your first round. Now you can plan out the second and even third round of planting for a nice harvest all season long.
Make use of empty spaces! For example, you’ve harvested all your lettuce and want to plant something else in its place.
You need to know the growing time required for that other plant. See if there’s enough time in your growing season to get planted before the fall frost.
Working backwards in your calculations is helpful. The easiest way to do this without doing quick math in your brain, is to use a spreadsheet like the one we offer below for free!
Transfer All Dates to Your Calendar
Now you’ve done all that planning and need a system to remember it all.
Use your cell phone calendar or write it down the old fashioned way on a calendar or planner you look at every day. It must be something you reference all day every day; otherwise, it won’t be helpful.
This is so important. Create automatic calendar alerts for yourself with exactly what you need to do each week. Do this and nothing will slip through the cracks.
You’ll see in my template below what you need to stay on top of when you’re growing your own food. Then, you’ll understand why setting these dates up in your calendar is so important.
It would be incredibly difficult to memorize it all.
Create automatic calendar alerts for yourself with exactly what you need to do each week. Do this and nothing will slip through the cracks.
Access Your Free Vegetable Garden Planner Template
Use our FREE Vegetable Garden Planner below to begin planning your garden today.
The Vegetable Garden Planner has three tabs with information for you to use to help plan your garden.
We’ll walk you through each step in the video here.
Zone Info, Key Temperatures, Planting Key (Tab 1)
- Enter your growing zone and frost dates
- Click / Hover over the cells labeled ZONE and LAST FROST DATE to see the links.
- Temperature Guide
- See what types of plants grow in different temperatures
- This will be helpful as you enter your average weekly temperatures in Tab 2.
- Planting Key
- Reference this Planting Key as you fill out Tab 2 with your crops
Vegetable Planner (Tab 2)
- Typical High and Low Temperatures (instructions in cell H2)
- Use data here to lookup your city.
- The chart will default to Monthly. You’ll want to click on Daily.
- Use the drop-down to select the month you’re looking for.
- Take a glance at the high and low temperatures by week. Eyeball the average highs and lows for each 7-day period. If you don’t want to do it by week, use the Monthly and enter in the same high/low for each week of that month.
- In the Vegetable Planner, enter the high and low temperatures for each week at the top above the month title.
- As you enter a value in each cell, the color will change based on the temperature: blue, green, yellow, or red.
- Weekly Dates
- Enter your planting start date in cell H6 and hit ENTER.
- Once you do that, all the subsequent dates will adjust weekly.
- Enter your planting start date in cell H6 and hit ENTER.
- Crops
- Enter your crops in column A. Add your own Notes, the Variety, Type, Spacing Needs, Days to Maturity, Bed # for your garden.
- We’ve included a sample of crops for our garden to help get you started!
- Each crop listed is linked to Tab 3 Plant Growing Notes to help you understand growing needs for each plant.
- Use this template and adjust crops accordingly to fit your needs.
- The growing notes will remain for your reference on Tab 3 should you want to delete any crops from the Vegetable Planner
- Use the Planting Key
- This is super handy when you try to read what we will do each week.
- Feel free to adjust the key so it makes sense for you.
Planting Key Definitions
| SS | Start Seeds Indoors: This is the date we start seeds indoors. |
| TS | Transplant Seedlings Outdoors: This is the date we plan the seedlings outside. |
| DS | Direct Seed: This is when you sow a seed directly in your garden outside. |
| G? | Germinate / Sprout?: Want to check if the seed has germinated. |
| H (#) | Harvest (round #): If you want to plant multiple rounds of the same plant, label the harvests as well. Optional. |
| P | Prune: Reminder to prune. |
| R | Regrow: When to regrow plants before planting in pot. |
| PL | Plant in Pot: After regrowing a plant, plant in pot. This is before you transplant outside. |
| TH | Thinning: If a plant needs more space. |
| F | Fertilizer: Add nutrients or organic OMRI fertilizer to plant. |
Plant Growing Notes (Tab 3)
We’ve included plant growing notes for 21 different plants. These include how to grow each, their varying plant needs, and information on harvesting.
We revised our original crop plan after using this tool.
You need to use a visual map of your garden space AND a planner like the one above (free download) to plan your garden.
Revised Our Original Crop Plan After Using the Free Vegetable Garden Planner Template
We realized a few flaws in our original plan after writing down the growing needs of our vegetables.
Below, we’ll show you our original vegetable maps, and compare them to our revisions.
Revisions To Bed 1 – Solanaceae – Potato Family
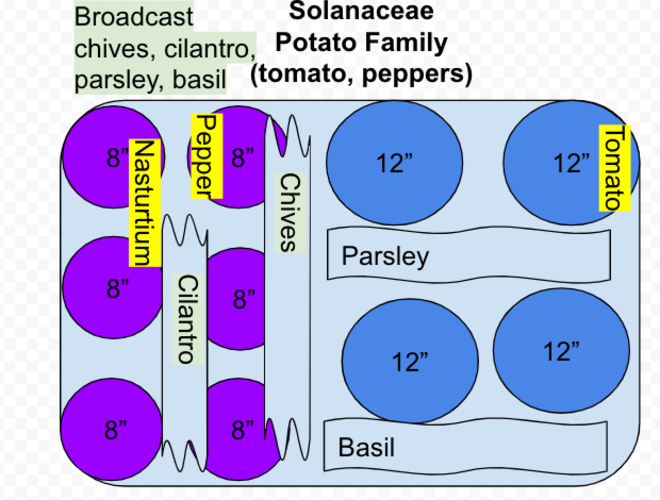
- There was not enough space for the tomato plants.
- Nasturtiums grow really big. They sprawl everywhere (in a pretty way), but we didn’t account for that in our visual.
- Parsley, basil, cilantro are not broadcasted. They’re transplanted in the garden.
- Chives are not broadcasted either. You plant them in rows.
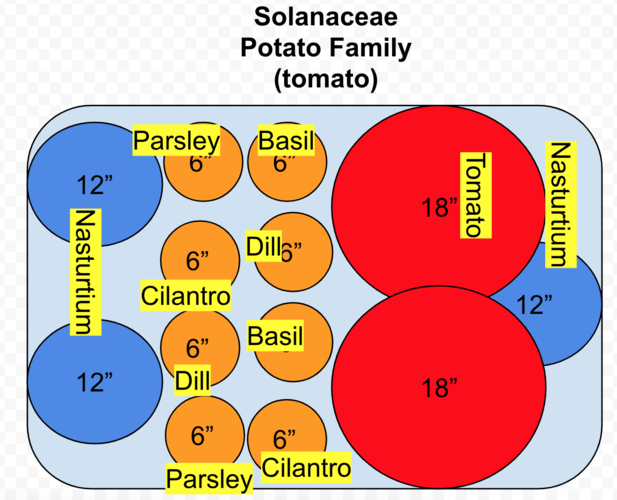
- Moving taller tomato plants to the north side of the bed.
- Nasturtiums enjoy light shade. Once we plant them at the edges, they will grow over the sides of the beds. This leaves room for other plants on the inside of the bed.
- Spreading out the parsley, basil, dill, and cilantro on the inside of the bed, away from the taller, sprawling plants.
Revisions To Bed 2 – Leguminose – Pea Family
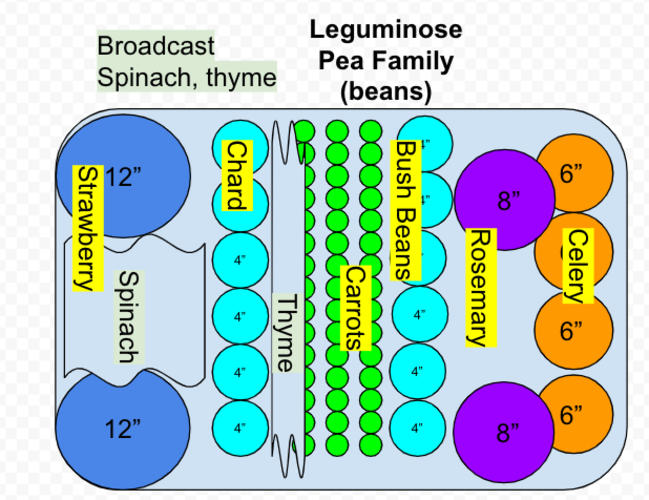
- Bush beans are not big producers.
- Carrots take a very long time to grow.
- Strawberries really need their own bed or space (think containers). They don’t yield a ton for the time you put into them. We may end up growing some transplants from the in-laws in containers.
- Thyme is not generally broadcasted.
- Rosemary gets massive! We cut down on these plants.
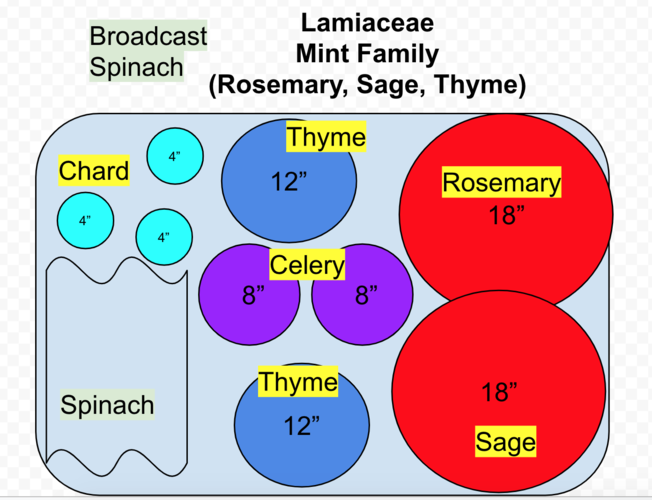
- Instead of Bed 2 being the Leguminose – Pea Family bed, we’re adjusting so it’s the Lamiaceae – Mint Family bed. The mint family includes rosemary, sage, and thyme.
- We’re giving more room for the rosemary. Since these get so big once established, we’re starting with just one plant instead of two.
- Sage will go well in this bed (moved from Bed 3).
- Chard needs some more room. Three plants should do fine for our family.
- Moving the celery to the middle, to give room for the larger rosemary and sage plants on the north side of the bed.
Revisions To Bed 3 – Brassicaceae – Cabbage Family
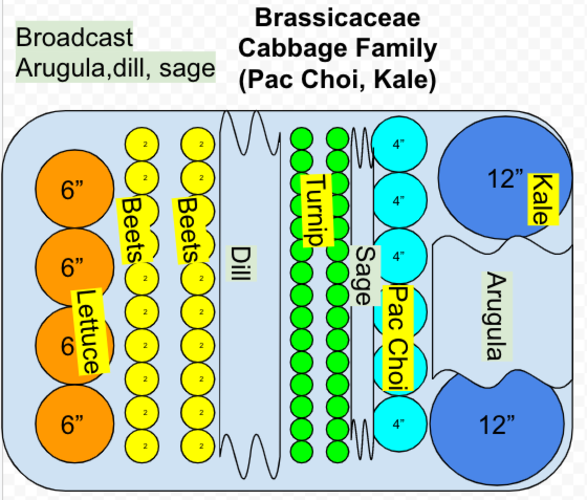
- Dill and Sage are not typically broadcasted and need more space than what we thought.
- Brassicas like kale and pac choi get hit hard with pests.
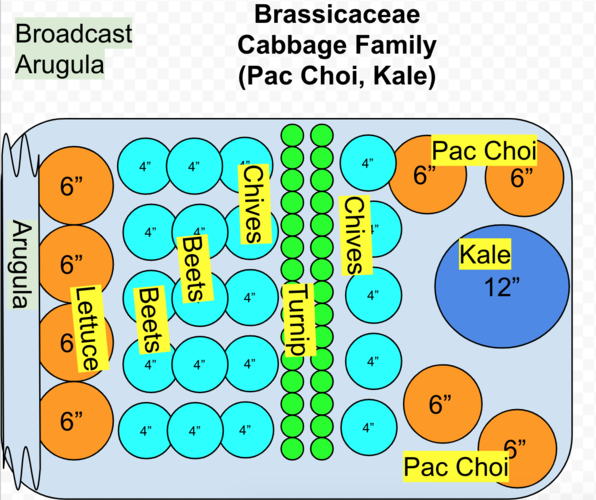
- Pac choi grows a little larger, so we included less plants.
- We moved chives to this bed since the pac choi and kale plants may get hit hard with pests. Chives will confuse the pests and prevent the whole bed from being devastated. Cross your fingers we control those Brassica-loving plants.
Final Thoughts Using Our Free Vegetable Garden Planner Template
In total it took about 8 hours to finalize our vegetable planner and map. This doesn’t take into account the time it took to do the original vegetable map.
As you can see, it can be quite a lot to plan out your vegetable garden. Hopefully, you take advantage of the free vegetable garden planner template we provided to give you a head start planning your raised garden beds.
This exercise shows you, it’s impossible to plan a garden using one visual (just the vegetable map). You need to use the visual map and the planner with key dates and temperatures. Doing so will make your entire plan come together.
Do not feel overwhelmed by this. Break down the task into smaller chunks.
Start early enough and you could learn about 2-3 crops each day to fill in your plan for the season. Over time you’ll have it filled out.
Our free template comes populated with 21 different crops to consider planting in your garden. If you’re just starting out and need some ideas of what to plant, check out this post on fast-growing vegetables. The article also goes into companion planting and mapping out your growing space.
Have you used a garden planner or journal to plan out your season? Comment below!
How will a vegetable garden planner help me?
Keep track of local temperatures, key planting dates, and tasks for building a successful garden. This planner comes pre-populated with 20+ vegetables for your garden. All you need to do is customize it with your zone-specific information.
How will garden planners help beginners?
This free online vegetable garden planner template is helpful when you’re just starting out so you know exactly when and where to plant your seeds or transplants in the garden.
Okay I am working on my vegetable planner right now and all I have to say is holy cow, P.K., this is so thorough, informative and helpful. I cannot believe how much information is already built into this planner! It is incredible. I am a beginner veggie gardener moving from city / container garden to a much larger yard. I was so overwhelmed starting a new garden from square one, but the content and instructions from GrowMuse are so easy-to-use and helpful now I can’t wait to get growing!!
I am so happy to hear how helpful the planner has been for you! Happy planting and have fun in the garden!